Search Thermo Fisher Scientific
- Order Status
- Quick Order
-
Don't have an account ? Create Account
Search Thermo Fisher Scientific
The Invitrogen Tali Image-based Cytometer has been discontinued, but you can still find consumables and accessories, software download information, and compatible reagents, as well as videos and application notes for your instrument (see below).
The Countess II FL Automated Cell Counter is a fully automated, 3-channel cell counter to rapidly analyze fluorescently labeled cells or trypan blue stained cells in suspension.
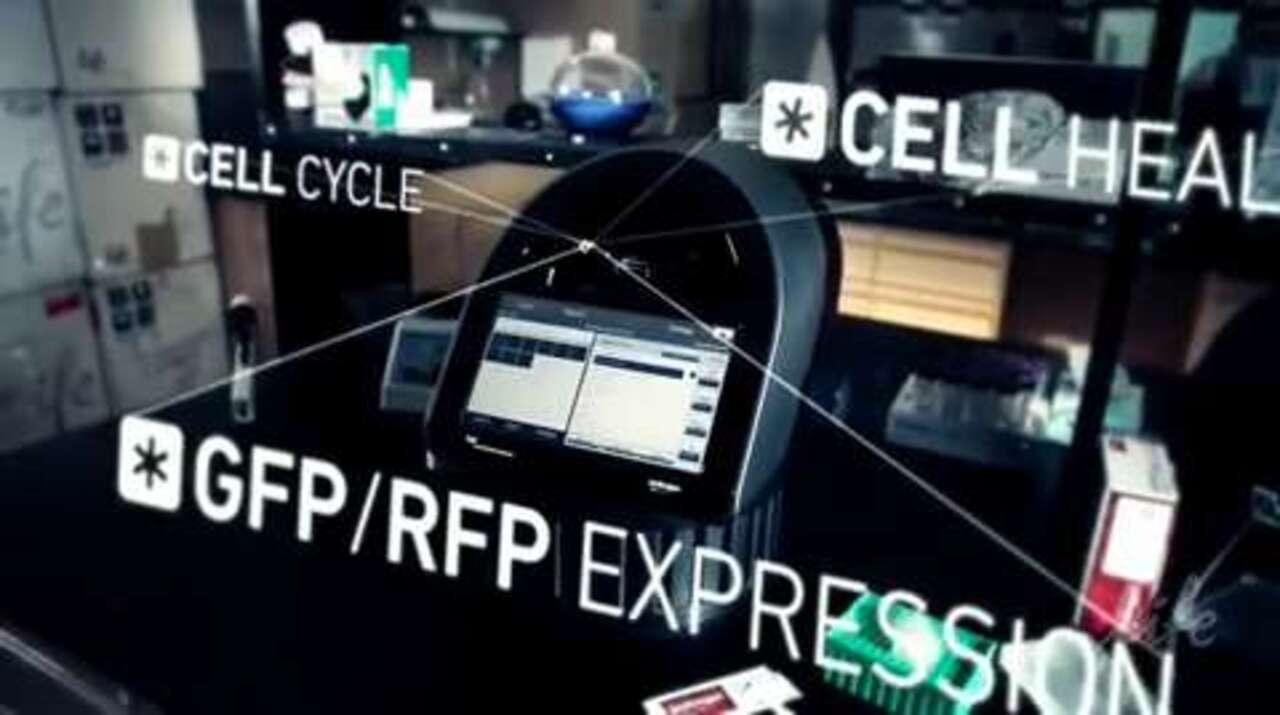
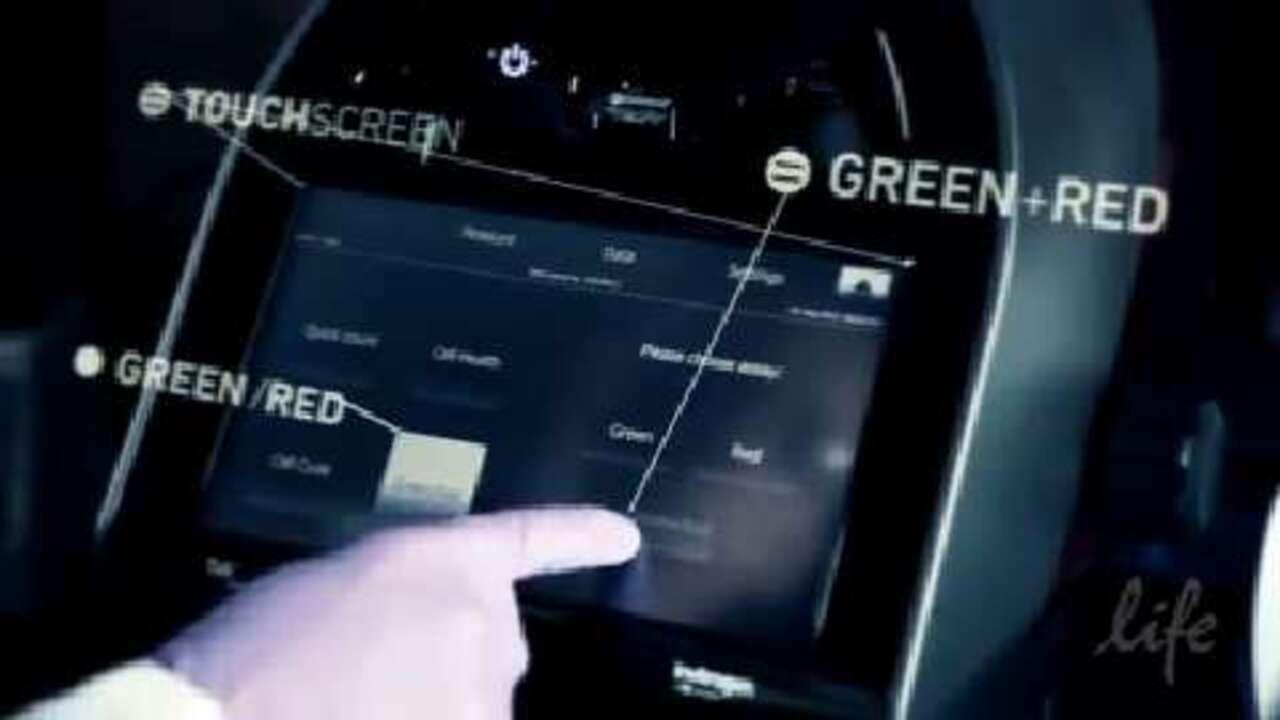
The Tali Image-Based Cytometer can be used to detect green and red fluorescence of a variety of dyes and stains. This table ranks the fluorescence intensity of various dyes when examined on the Tali Image-Based Cytometer. Unless otherwise indicated, cells were labeled with the indicated fluorescent dye or stain at concentrations suggested in the product manual and analyzed on the Tali Image-Based Cytometer using the “Green+Red Setting” setting. In some cases, there was spectral overlap of the fluorescence emission (commonly known as bleedthrough) into the opposite channel. This information is also included in the table.
| Dye, product tested | Excitation (nm) | Emission (nm) | Expected emission channel | Green channel signal | Red channel signal | Recommendations |
|---|---|---|---|---|---|---|
| 7-AAD (7-aminoactinomycin D) | 549 | 645 | Red |
None
|
+++
| Use 1–2 uL per mL |
| R-PE (R-phycoerythrin), CD3-RPE conjugate | 564 | 577 | Red |
None
|
++
| Test titration of antibody conjugate |
| CellROX™ Orange Reagent | 545 | 565 | Red | None |
+++
| Use according to product manual |
| MitoTracker™ Orange CM-H2TMRos | 551 | 575 | Red |
None
|
++
| Use according to product manual |
| Ethidium homodimer-1 | 528 | 618 | Red |
None
|
+++
| Use 1 uM |
| Rhodamine Red-X anti-mouse secondary | 573 | 591 | Red |
None
|
+
| Basically undetectable |
| Dye, product tested | Excitation (nm) | Emission (nm) | Expected emission channel | Green channel signal | Red channel signal | Recommendations |
|---|---|---|---|---|---|---|
| SYTOX™ Green stain | 504 | 523 | Green |
+++
|
+
| Use 12.5 nM |
| LIVE/DEAD™ Fixable Green Dead Cell Stain | 495 | 520 | Green |
+++
|
++
| Spectral overlap into red channel at lowest concentration tested (0.25 µL/mL) |
| CellTrace™ Green | 492 | 517 | Green |
+++
|
+
| Use at 50 nM–250 nM |
| CellEvent™ Green reagent | 502 | 530 | Green |
++
|
None
| 10 µM final concentration |
| SYTO™ 9 stain | 485 | 498/501 | Green |
+++
|
None
| Use 100 nM |
| TO-PRO™-1 | 515 | 531 | Green |
++
|
++
| Due to spectral overlap can not be used for multiplexing experiments |
| FM™ 1-43X | 510 | 626 | Green |
+++
|
+++
| Due to spectral overlap can not be used for multiplexing experiments |
| CellTracker™ Green CFDA-AM | 492 | 517 | Green |
+++
|
None
| Use according to product manual |
| 5-(and-6)-carboxy-2',7'-dichlorofluorescein diacetate (carboxy-DCFDA), mixed isomers | 505 | 525 | Green |
++
|
None
| Use at 25–50 uM |
| Annexin V-FITC | 494 | 518 | Green |
++
| None | Use according to product manual (test 10 uL Annexin V-FITC if signal is dim) |
| Acridine Orange | 500 | 526 | Green |
+++
| None | For Jurkat cells suggest using 0.25 – 0.5 uM (test titration of the dye to ensure no overlap into the red channel) |
| Calcein AM | 494 | 517 | Green |
+++
|
+
| Use at 0.1–1 uM (test titration of dye to ensure no overlap into red channel). |
+ = Undetectable to barely detectable on the histogram, but can see spots on the Tali images.
++ = Can detect peak on histogram, but may be difficult to separate positive and negative peaks.
+++ = Easily detectable peaks on histogram. Positive and negative populations can be easily resolved.
As a precaution when installing any update, save your vital data from the Tali Image-Based Cytometer:
Note: If you experience system instability when exporting multiple files, all data are preserved. Turn the instrument off and then on to reinitialize the system.
Download the current software v2.1 (release date 10/30/2012) and save it to a clean USB drive.
Download Tali software v2.1 (4.3 MB)
NOTE: Please contact Technical Support if you are updating from software version 1.0.6.5.
a. Press the download button and save the Tali Software zip file to your computer.
b. Obtain a USB Drive and remove all files or programs from this drive. Existing files can interfere with the software installation process thus it is important to remove all files or programs from the USB drive before continuing.
c. Using the clean USB drive, place the three programs and the image file from the zip file onto the USB drive.
d. After the transfer, review the file and program configuration of the USB Drive. The configuration should be the following (see below).

a. Insert the USB drive into the USB port located on the front of the Tali Instrument.
b. Press the ‘Settings’ tab (highlighted with the red box below).

c. Press the 'Update firmware' button (highlighted with the red box below).

d. Wait until the Tali instrument recognizes the USB drive and the green light is visible on the 'Update' button (see below).

e. Press the 'Update' button.
f. When the Update is complete the instrument will need to be restarted. Press the ‘OK’ button (see below).

g. After the instrument performs the restart, press the ‘Settings’ tab and check that the software has been updated to the latest version (see below).

The Tali Image-Based Cytometer can be used to detect green and red fluorescence of a variety of dyes and stains. This table ranks the fluorescence intensity of various dyes when examined on the Tali Image-Based Cytometer. Unless otherwise indicated, cells were labeled with the indicated fluorescent dye or stain at concentrations suggested in the product manual and analyzed on the Tali Image-Based Cytometer using the “Green+Red Setting” setting. In some cases, there was spectral overlap of the fluorescence emission (commonly known as bleedthrough) into the opposite channel. This information is also included in the table.
| Dye, product tested | Excitation (nm) | Emission (nm) | Expected emission channel | Green channel signal | Red channel signal | Recommendations |
|---|---|---|---|---|---|---|
| 7-AAD (7-aminoactinomycin D) | 549 | 645 | Red |
None
|
+++
| Use 1–2 uL per mL |
| R-PE (R-phycoerythrin), CD3-RPE conjugate | 564 | 577 | Red |
None
|
++
| Test titration of antibody conjugate |
| CellROX™ Orange Reagent | 545 | 565 | Red | None |
+++
| Use according to product manual |
| MitoTracker™ Orange CM-H2TMRos | 551 | 575 | Red |
None
|
++
| Use according to product manual |
| Ethidium homodimer-1 | 528 | 618 | Red |
None
|
+++
| Use 1 uM |
| Rhodamine Red-X anti-mouse secondary | 573 | 591 | Red |
None
|
+
| Basically undetectable |
| Dye, product tested | Excitation (nm) | Emission (nm) | Expected emission channel | Green channel signal | Red channel signal | Recommendations |
|---|---|---|---|---|---|---|
| SYTOX™ Green stain | 504 | 523 | Green |
+++
|
+
| Use 12.5 nM |
| LIVE/DEAD™ Fixable Green Dead Cell Stain | 495 | 520 | Green |
+++
|
++
| Spectral overlap into red channel at lowest concentration tested (0.25 µL/mL) |
| CellTrace™ Green | 492 | 517 | Green |
+++
|
+
| Use at 50 nM–250 nM |
| CellEvent™ Green reagent | 502 | 530 | Green |
++
|
None
| 10 µM final concentration |
| SYTO™ 9 stain | 485 | 498/501 | Green |
+++
|
None
| Use 100 nM |
| TO-PRO™-1 | 515 | 531 | Green |
++
|
++
| Due to spectral overlap can not be used for multiplexing experiments |
| FM™ 1-43X | 510 | 626 | Green |
+++
|
+++
| Due to spectral overlap can not be used for multiplexing experiments |
| CellTracker™ Green CFDA-AM | 492 | 517 | Green |
+++
|
None
| Use according to product manual |
| 5-(and-6)-carboxy-2',7'-dichlorofluorescein diacetate (carboxy-DCFDA), mixed isomers | 505 | 525 | Green |
++
|
None
| Use at 25–50 uM |
| Annexin V-FITC | 494 | 518 | Green |
++
| None | Use according to product manual (test 10 uL Annexin V-FITC if signal is dim) |
| Acridine Orange | 500 | 526 | Green |
+++
| None | For Jurkat cells suggest using 0.25 – 0.5 uM (test titration of the dye to ensure no overlap into the red channel) |
| Calcein AM | 494 | 517 | Green |
+++
|
+
| Use at 0.1–1 uM (test titration of dye to ensure no overlap into red channel). |
+ = Undetectable to barely detectable on the histogram, but can see spots on the Tali images.
++ = Can detect peak on histogram, but may be difficult to separate positive and negative peaks.
+++ = Easily detectable peaks on histogram. Positive and negative populations can be easily resolved.
As a precaution when installing any update, save your vital data from the Tali Image-Based Cytometer:
Note: If you experience system instability when exporting multiple files, all data are preserved. Turn the instrument off and then on to reinitialize the system.
Download the current software v2.1 (release date 10/30/2012) and save it to a clean USB drive.
Download Tali software v2.1 (4.3 MB)
NOTE: Please contact Technical Support if you are updating from software version 1.0.6.5.
a. Press the download button and save the Tali Software zip file to your computer.
b. Obtain a USB Drive and remove all files or programs from this drive. Existing files can interfere with the software installation process thus it is important to remove all files or programs from the USB drive before continuing.
c. Using the clean USB drive, place the three programs and the image file from the zip file onto the USB drive.
d. After the transfer, review the file and program configuration of the USB Drive. The configuration should be the following (see below).
a. Insert the USB drive into the USB port located on the front of the Tali Instrument.
b. Press the ‘Settings’ tab (highlighted with the red box below).
c. Press the 'Update firmware' button (highlighted with the red box below).
d. Wait until the Tali instrument recognizes the USB drive and the green light is visible on the 'Update' button (see below).
e. Press the 'Update' button.
f. When the Update is complete the instrument will need to be restarted. Press the ‘OK’ button (see below).
g. After the instrument performs the restart, press the ‘Settings’ tab and check that the software has been updated to the latest version (see below).
For Research Use Only. Not for use in diagnostic procedures.

