Search Thermo Fisher Scientific
- Order Status
- Quick Order
-
Don't have an account ? Create Account
Search Thermo Fisher Scientific
Cryo-electron tomography (cryo-ET) is a technique that allows the study of the 3D structure of cells and tissues at near-native conditions. Sample preparation is a critical step in cryo-ET, which can greatly affect the quality and resolution of the results. Cryo-ET has been applied to many different sample types, from single molecules to protein complexes, viruses, bacteria, cells, to tissue cells and large tissue samples. Cells are either vitrified through plunge-freezing (as in single particle analysis) or high pressure freezing (HPF). Plunge-freezing is suitable for samples that are relatively thin or have a limited amount of materials. For larger specimens like organoids or bulk tissue, high pressure freezing is commonly used. After the vitrification step, depending on the size of the sample, a thinning step is included in the sample preparation using focused ion beam (FIB) or plasma ion beam milling to produce cryo-lamella that can be penetrated by electron beams.


To prepare samples for cellular cryo-ET, routine culture methods are used to prepare cells in bulk, once your culture is ready the cells are prepared into a suspension and seeded onto carbon-coated gold (for biocompatibility) electron microscopy grids. These grids can be additionally functionalized for better cellular adhesion or distribution. Depends on the cell type, there are two different workflows can be used. For cells naturally in suspension they can be applied in the Thermo Scientific Vitrobot System directly to the grid. For adherent or large cells, they require incubation for 1-7 days to allow adhesion and flattening of the cells. When the cells are evenly spaced on the grid, they are taken for plunge freezing.
Locating the structure of interest can be difficult in the vast complexity of the natural cellular environment. However, through correlative light and electron microscopy, (CLEM), various florescent labels can be used to tag cells. For the cellular cryo-tomography workflow, Thermo Scientific iFLM (Integrated Fluorescence Light Microscope) Correlative System combines light and electron microscopy into one system, eliminating extra sample transfer steps and enabling a streamlined cryo-correlative solution for cryo-tomography.

Cells prepared by routine culture methods are grown on carbon-coated gold electron microscopy grids. In order to preserve the native cellular environment, cells are not stained but flash-frozen directly on the EM grid. The cryogenic freezing process is so fast that liquid water forms non-crystalline vitreous ice, thus avoiding the damage caused by the formation of crystals at slower freezing rates. This process preserves the ultrastructure of the flash-frozen cell. Cells can be preserved in their native hydrated state by rapid plunge freezing in the Vitrobot System.
To achieve the rapid cooldown of a sample when employing plunge freezing, sample thickness and the liquid film can be limiting and requires considerations of the sample preparation prior the freezing. The Vitrobot automatically supports some of the preparation steps just prior the plunge freezing. Immediately after the cells are automatically immersed in liquid ethane at -180C, the rapidly frozen cells are now vitrified, and the EM grid is ready to transfer to the cryo-FIB for lamella preparation.
.jpg "Thermo Scientific Vitrobot System")
Vitrified specimens must be thinned prior to 3D imaging by a cryo-TEM like the Thermo Scientific Krios G4 or Thermo Scientific Glacios 2 Cryo-TEM. Sample thinning is essential for the tomography workflow because the electron beam in the TEM can only pass through samples that are thin enough to transmit 200–300 keV electrons. Cryo-FIB thinning is a straightforward and more manageable method compared to cryo-ultramicrotomy, and it avoids intrinsic cutting artifacts of mechanical sectioning under cryo-temperatures (e.g. compression in the cutting direction).
A dedicated cryo-focused ion beam (FIB) microscope prepares a thin, uniform lamella at the vitreous temperature (approximately -170°C). Thermo Scientific cryo-FIBs combines scanning electron beam (SEM) and a focused ion beam (FIB). The electron beam is used for imaging the sample, and the ion beam ensures precise removal of material from vitrified cells. Locating the structure of interest can be difficult in the vast complexity of the natural cellular environment. However, using cryo-correlative microscopy, the structures of interest are easily identified. An optional iFLM Correlative System combines light and electron microscopy into one system, eliminating extra sample transfer steps and enabling users to create a streamlined cryo-correlative solution for cryo-tomography. The iFLM Correlative System delivers the localization of fluorescent targets inside the chamber, allowing users to check the fluorescence signal inside milled lamellae and correlate two imaging modalities directly within one microscope.
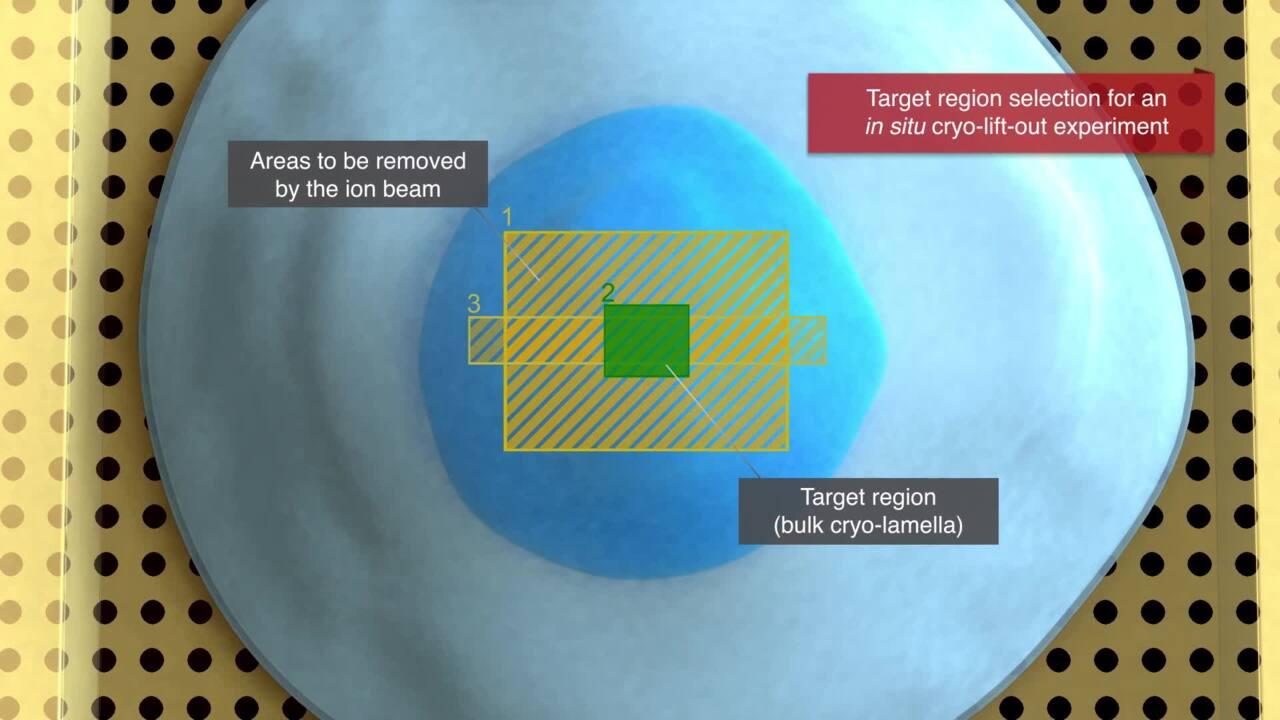
Following localization by correlative microscopy, the cryo-FIB is used to prepare a thin, electron-transparent lamella by removing material above and below the target region. The cryo-lamella contains the region of interest and can be milled as thin as 100–200 nanometers. There is no mechanical sectioning with a cryo-FIB. Instead, the vitrified sample is thinned with the help of a focused beam of gallium ions or plasma that is scanned across the frozen sample surface, removing surface atoms in a layer-by-layer fashion in a process called sputtering (also referred to as ion beam milling). Sample thinning is essential for the tomography workflow because the electron beam in the cryo-TEM can only pass through samples that are thin enough to transmit 200–300 keV electrons.
Automation software, such as Thermo Scientific Auto Slice and View Software, allows lamella to be prepared without excessive user interaction. This can be run overnight without supervision enabling maximum use of the systems. After the lamella are prepared, they can be imaged again with the fluorescent microscope of the iFLM Correlative System allowing for target imaging area confirmation and for navigation in the cryo-TEM. Thinned lamellae and meta data can be passed to the cryo-TEM for imaging and analysis. After the milling step, thin cryo-lamellas are transferred to the Krios G4 or Glacios 2 Cryo-TEM where the actual tomographic image acquisition takes place. The images in the tomographic series are acquired by tilting the sample in known increments. Individual projection images are then computationally combined in a procedure known as back-projection, which creates the 3D tomographic volume.
Cryo-tomography imaging of bulk samples like organoids or larger models allows imaging at more life-like conditions for the sample. The cryofixation of samples with thickness of several hundred micrometers such as tissue biopsies, organoids, plant tissues, etc., is only possible by high-pressure freezing. High-pressure freezing is a reliable method for cryoimmobilization of versatile cellular specimens. Samples are subjected to high pressure during freezing with nitrogen, to prevent formation of ordered crystalline ice which expands in volume during freezing.
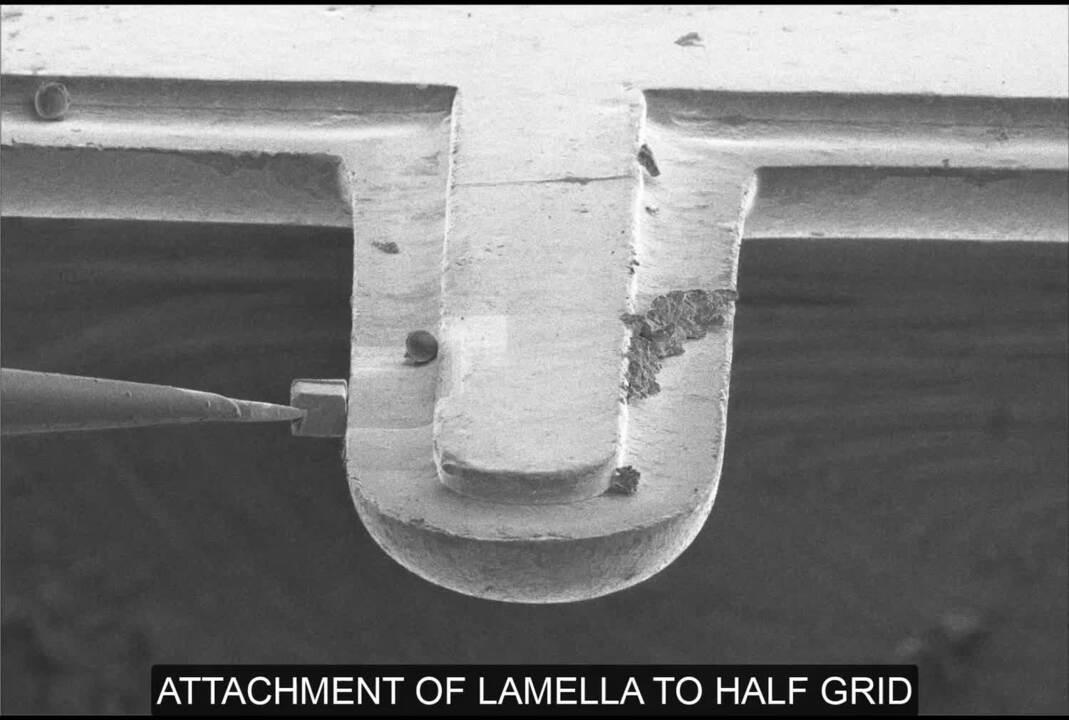
For imaging within the TEM, the most applied method is the sandwich or waffle method. Here a TEM grid is loaded with tens of microns of sample and processes similarly to the in-situ workflow. The second method is cryo-lift out, a method most like laser dissection. Here a piece of tissue is extracted from site-specific regions with the high-precision Thermo Scientific EasyLift NanoManipulator. These lamellas can subsequently be placed inside Autogrids for cryo-TEM and further imaging of protein structures and protein networks.
For bulk samples like biopsies, which might not have any fluorescence, another exciting workflow is volume electron microscopy (vEM). Here, an HPF sample is serially sliced with the ion beam, each time imaging the freshly cut surface. This information can be reconstructed into a 3D volume. This suits biological questions which require resolution in nanometers rather than angstroms. These 2 methods can be combined to provide ways to find regions of interest which are not fluorescently labelled.

Contextual volume imaging of high-pressure frozen mouse brain with no added stains or fixatives viewed with Thermo Scientific Auto Slice and View Software. Sample courtesy of MRC-LMB.
Prepare lamellas from specific targeted regions with nanometer-position accuracy. The high-precision EasyLift NanoManipulator option allows for extraction of site-specific regions, such as fluorescently labeled proteins, even from high-pressure frozen samples. These lamellas can subsequently be placed inside Autogrids for cryo-TEM and further imaging of protein structures and protein networks.
For Research Use Only. Not for use in diagnostic procedures.